

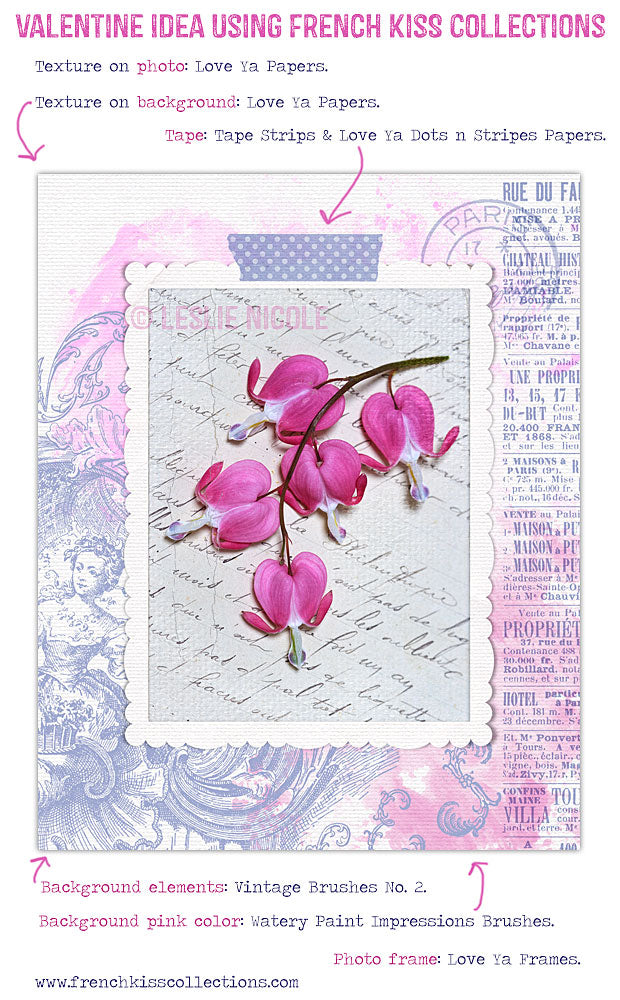
Here's an idea for using French Kiss Collections digital papers, brushes, textures and elements to create a Valentine with your own photograph.
Elements Used
- Texture on photo: Love Ya Papers.
- Texture on background: Love Ya Papers.
- Tape: Digital Tape Strips No. 1 & Love Ya Dots n Stripes Papers. (See how below.)
- Background elements: Vintage Brushes No. 2.
- Background pink color: Watery Paint Impressions Brushes.
- Photo frame: Love Ya Frames & Elements.
-
(Tip: Get the Love Ya Bundle for savings on all the Love Ya collections.)
How To Customize The Digital Washi Tape.
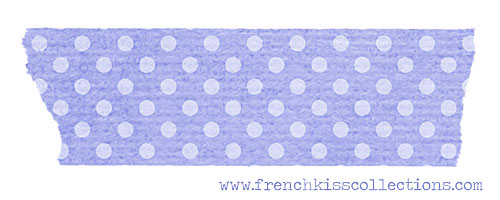
You can customize the Digital Tape Strips collections by clipping a digital paper (or any other image file) to the tape.
The Digital Tape Strips No. 1 collection has plain masking and transparent tape.

To create a custom, Washi style tape, select a digital paper. I've chosen a paper from the Love Ya Dots n Stripes Papers. collection that is normally a pink color.
Below is the Photoshop layer panel showing how to create the custom Washi tape.
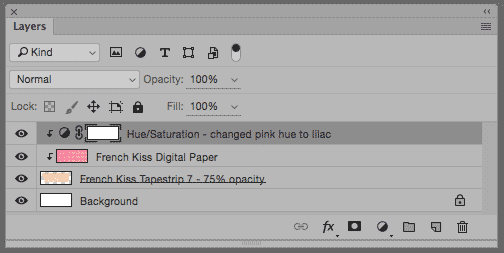
- Chose a masking tape strip that you want to use.
- Place your desired paper in the layer above the tape.
- With the digital paper layer selected, click Command (Mac) or Control (PC) + Option + G (Mac) or Alt (PC) to "clip" it to the tape layer. This is called a Clipping Mask.
- Size and adjust the digital paper with the Transform Tool so that it fits the tape as you like.
- Then, above the digital paper layer add a Hue/Saturation Adjustment layer. (Adjustment layers are found at the bottom of the layer panel. The icon looks like a circle halved in black/gray.
- Clip this layer to the digital paper the same as in step No. 3
- Adjust the color as you like. You may have to fiddle with saturation as well as hue. (To change the lightness/darkness, I usually prefer to use a Levels Adjustment Layer. - found in the same place as the Hue/Saturation and use it the same way - just stack it on top of the Hue/Saturation layer.)
- To adjust the opacity of the Washi tape, lower the opacity on the tape layer. I used 75%.
It's that easy!
Subscribe For Freebies!
Don't miss out on announcements of specials, sales and, tutorials and monthly Freebies. Plus, get instant FREE texture, overlay and brush collections!


Su Hall
February 24, 2016
Washi is so much fun! Thank you for your tut! That card is lovely!
Su